The Ultimate iOS 18 iPhone Backup Guide: Keep Your Data Safe
An iPhone often serves as a repository for a significant portion of an individual's digital life, from cherished photos and critical messages to essential contacts and app data. The prospect of losing this information due to device damage, loss, theft, or an unexpected software glitch can be a source of considerable anxiety. Regularly performing a BACKUP IPHONE operation stands as the most effective defense against such data loss, acting as a vital insurance policy for digital memories and crucial information.
I. Why Backing Up Your iPhone is Essential (Especially with iOS 18)
The Undeniable Importance of Regular Backups
The practice of backing up an iPhone is fundamental to safeguarding personal data. As Apple's support materials suggest, backing up is one of the premier methods to ensure that information isn't lost if a device is damaged or misplaced. This simple procedure can prevent the irreversible loss of years of photos, conversations, and personalized settings.
Peace of Mind in Our Digital Age
Beyond the practical aspect of data recovery, consistent backups offer significant peace of mind. Knowing that personal data is securely duplicated allows for a more relaxed and confident interaction with the device. Furthermore, these backups are instrumental in facilitating a smooth transition when upgrading to a new iPhone, enabling the transfer of information and settings with minimal disruption.
A Quick Note on iOS 18
While the arrival of iOS 18 brings a host of new features and customizations to the iPhone experience , the core mechanisms for how to backup an iphone remain consistent with previous iOS versions. Official Apple support channels indicate no specific changes or new features related to the iPhone backup process itself within the iOS 18 updates. Users familiar with backing up their iPhones on earlier iOS versions will find the process largely unchanged.
However, the introduction of a major operating system update like iOS 18 is precisely when the importance of a recent backup is amplified. Although rare, the process of upgrading an operating system can occasionally introduce errors or, in worst-case scenarios, lead to data loss. Therefore, creating a comprehensive backup before initiating the iOS 18 update is a strongly recommended precautionary measure. This "backup-first" approach, while the 'how-to' remains familiar, provides a critical safety net, ensuring that all personal data is secure before embarking on the software update. This practice can also foster greater confidence in adopting new operating system versions; knowing that data is protected allows users to explore new features and capabilities, such as those introduced in iOS 18, without the apprehension of potential data loss.
II. Choosing Your iPhone Backup Method: iCloud vs. Computer
Apple provides two primary, officially supported methods for backing up an iPhone: iCloud Backup and backing up to a computer (Mac or PC). The optimal method varies depending on individual circumstances, including available storage, Wi-Fi access, and personal preferences for data management.
Overview of the Two Main "Apple Support" Recommended Methods
iCloud backups store data wirelessly to Apple's cloud servers, offering convenience and accessibility. Computer backups, on the other hand, save data locally to a Mac or Windows PC, providing users with direct control over the backup file.
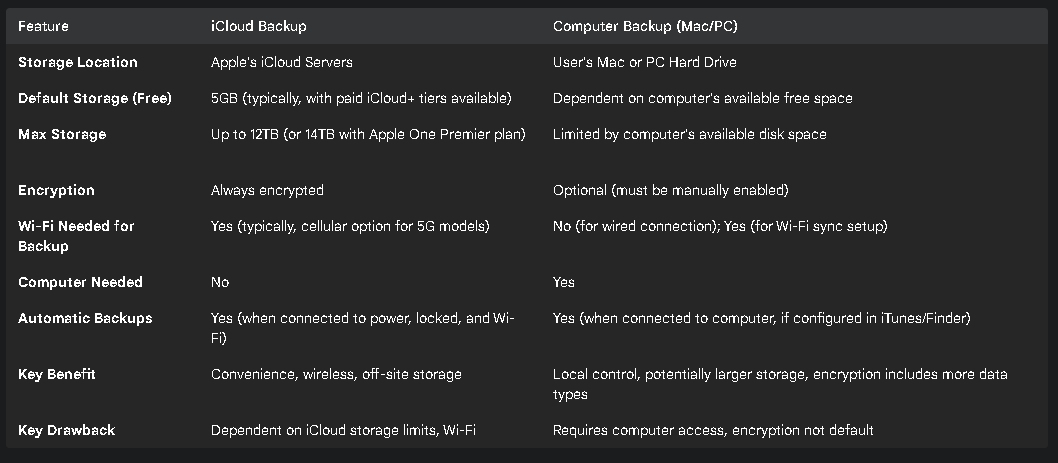
To aid in selecting the most suitable approach, the following table offers a side-by-side comparison:
Table 1: iCloud Backup vs. Computer Backup at a Glance

While iCloud offers considerable convenience and automatic encryption, its reliance on cloud storage implicitly encourages deeper integration within the Apple ecosystem. The initial free 5GB of iCloud storage is often insufficient for complete device backups, potentially leading users to subscribe to paid iCloud+ plans , which contributes to Apple's service revenues and can make transitioning away from the ecosystem more involved if one becomes heavily reliant on iCloud.
Conversely, computer backups offer users a greater sense of control, with data stored locally. While iCloud backups are always encrypted, the option to encrypt computer backups—though not enabled by default—can appeal to users who prefer their data not to be transmitted or stored on third-party servers, even Apple's. Enabling encryption for computer backups is crucial as it allows for the inclusion of sensitive data like Health and Keychain information.
It's also noteworthy that these methods are not necessarily mutually exclusive. Apple itself suggests that using both iCloud and computer backups can serve as an alternative backup strategy. This approach provides an enhanced level of data redundancy—an off-site copy via iCloud and a local copy on a computer—aligning well with a cautious approach to data safety.
Recommendation: Which Method Suits Different User Needs?
iCloud: This method is generally ideal for users who prioritize convenience, desire automatic wireless backups, and want the ability to restore their data from anywhere with a Wi-Fi connection. It's particularly well-suited for individuals who may not regularly connect their iPhone to a computer.
Computer: This option is more appropriate for users who have limited iCloud storage or prefer not to pay for additional cloud space. It also benefits those who wish to maintain local control over their backup files or need to back up very large amounts of data where computer disk space is more readily available. Furthermore, it is the only method to back up certain data types like Health and Keychain information if these are not already being synced via iCloud, provided the backup is encrypted.
III. How to Backup Your iPhone to iCloud (iOS 18 Guide)
What is iCloud Backup?
iCloud Backup is Apple's service that allows users to wirelessly back up the data on their iPhone to Apple's cloud servers. This process is distinct from iCloud syncing; while services like iCloud Photos or Contacts continuously sync data across devices, iCloud Backup takes periodic snapshots of information and settings stored on the device that are not already synced elsewhere in iCloud.
What iCloud Backup Includes (and Excludes):
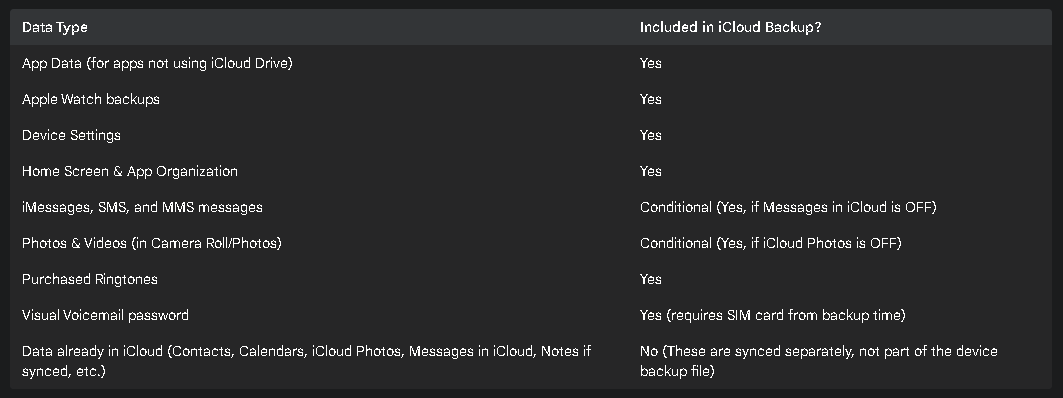
Understanding what is and isn't included in an iCloud Backup is crucial for managing expectations and ensuring all desired data is protected. An iCloud Backup includes information and settings stored on the device that are not already being synced to iCloud.
Table 2: Data Covered by iCloud Backups

This distinction between synced data and backed-up data is important. For example, if iCloud Photos is enabled, photos and videos are synced to iCloud and are not included in the iCloud device backup file itself. Similarly, if Messages in iCloud is active, messages are synced and not part of the backup. This understanding helps clarify why an iCloud Backup file might be smaller than expected if many data types are already being managed through iCloud's syncing services.
Step-by-Step: Enabling and Using iCloud Backup (iOS 18 Interface)
The following steps guide users through enabling and using iCloud Backup on an iPhone running iOS 18. The interface for these settings is anticipated to remain consistent with recent iOS versions.
Connect to Wi-Fi: A stable Wi-Fi connection is a prerequisite for iCloud backups to occur.
Navigate to iCloud Backup settings:
Turn on "Backup This iPhone":
Understanding Automatic Backups:
How to Perform a Manual iCloud Backup:
Optional: Backing up Over Cellular (for 5G models):
On iPhone models that support 5G, carriers may offer the option to back up the iPhone using the cellular network. This setting can be found in Settings > [your name] > iCloud > iCloud Backup, where "Back Up Over Cellular" can be turned on or off. While convenient, users should be mindful that cellular backups can consume significant data from their mobile plan and may incur charges from their carrier, especially for large backups.
Checking iCloud Backup Status and Last Backup Time:
To verify that iCloud backups are occurring as expected, users can check the status:
Navigate to Settings > [your name] > iCloud > iCloud Backup.
The screen will typically display the time of the "Last successful backup." Tapping on the name of the iPhone (often listed as "This iPhone") can provide more details.
Managing iCloud Storage for Backups:
Insufficient iCloud storage is a common issue. Apple provides a base amount of free storage (typically 5GB), which can be quickly consumed by backups.
Checking available iCloud storage: Go to Settings > [your name] > iCloud. The amount of used and available iCloud storage is displayed at the top.
Tips to reduce iCloud backup size:
Users can choose which apps include their data in the iCloud backup. This can significantly reduce the backup size. Go to Settings > [your name] > iCloud. Tap either "Storage" or "Manage Account Storage," then tap "Backups." Select the name of the device being used. From the list of apps, turn off the toggle for any apps whose data is not essential to back up. Confirm by tapping "Turn Off". Data from deselected apps will be removed from future backups and existing backup data for those apps will be deleted from iCloud.
Upgrading iCloud storage if needed: If managing app data doesn't free up enough space, users can subscribe to an iCloud+ plan for more storage.
It's important to note that if iCloud Backup is turned off for a device, any existing backups for that device stored in iCloud are kept for 180 days before being automatically deleted. This provides a grace period but also means data isn't preserved indefinitely if the service is disabled.
IV. How to Backup an iPhone to Your Computer (iOS 18 Guide)
Why Use a Computer Backup?
Backing up an iPhone to a computer offers several advantages, including local control over the backup file, the potential for much larger backup storage (limited only by the computer's hard drive space), and offline access to the backup. Furthermore, an encrypted computer backup is the most comprehensive, as it can include sensitive data like Health and Activity records, and saved passwords in the Keychain.
What a Computer Backup Includes (and Excludes):
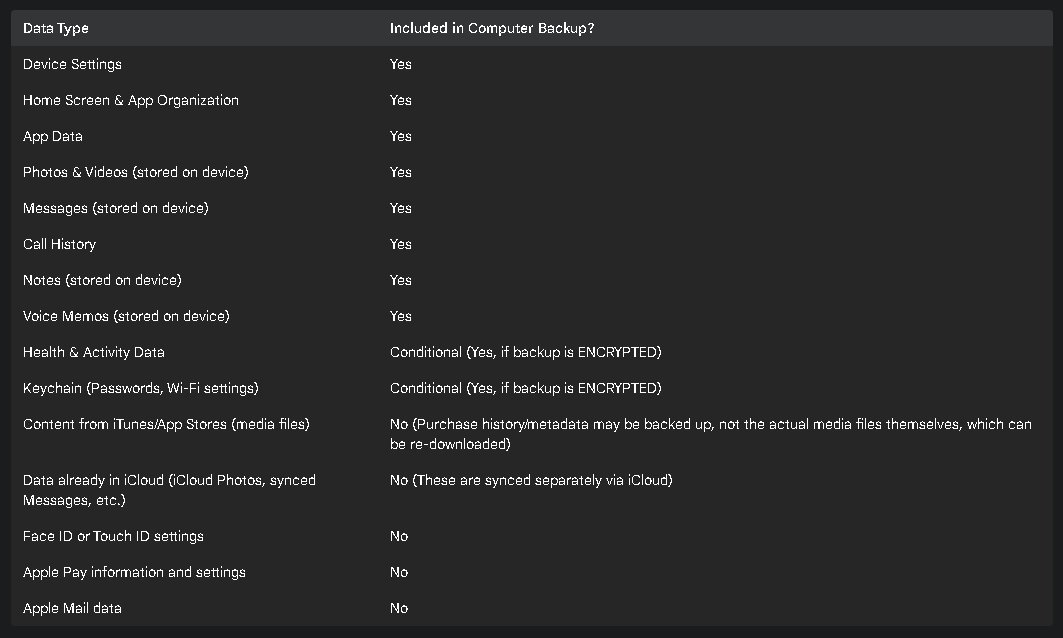
Generally, a computer backup includes almost all of a device's data and settings. If the backup is encrypted, it becomes even more comprehensive.
Table 3: Data Covered by Computer Backups

The conditional inclusion of Health and Keychain data based on encryption is a critical detail. Without encryption, this sensitive information is omitted from the backup.
A. Backing Up Your iPhone to a Mac (macOS Catalina 10.15 and later using Finder)
For Macs running macOS Catalina 10.15 or later, iPhone management, including backups, is handled through the Finder. Users with older macOS versions will need to use iTunes.
Connect your iPhone to your Mac: Use a USB or USB-C cable. Wi-Fi syncing can also be used if it has been previously configured.
Open Finder and select your iPhone: Once connected, the iPhone will appear in the sidebar of any Finder window. Select it.
Navigate the General tab: At the top of the Finder window for the selected iPhone, click on the "General" tab.
Choose backup options: In the Backups section, select "Back up all of the data on your iPhone to this Mac".
CRUCIAL: Encrypting Your Local Backup (Why and How):
Why: Encrypting the backup is highly recommended. It not only protects the backup with a password but also ensures that sensitive data such as Health information, Activity data, and Keychain passwords (including Wi-Fi passwords and website logins) are included in the backup.
How: Select the checkbox for "Encrypt local backup." Users will then be prompted to create a password. This password is vital; type it carefully and then click "Set Password".
WARNING: It is absolutely critical to remember this password. If the password for an encrypted backup is forgotten, the backup becomes unusable, and Apple cannot help recover it or the data within. Store this password securely.
Locating and managing Mac backups: After the backup process completes, clicking "Manage Backups..." will display a list of backups stored on the Mac, allowing users to see the backup file and its date.
The shift from iTunes to Finder for device management on newer macOS versions can sometimes be a point of adjustment for users accustomed to the older interface or those who also use Windows PCs where iTunes remains the tool.
B. Backing Up Your iPhone to a Windows PC (or older macOS using iTunes)
For Windows PCs, or Macs running macOS Mojave 10.14 or earlier, iTunes is the application used for iPhone backups.
Connect your iPhone to your PC: Use a USB or USB-C cable. Wi-Fi syncing can also be used if previously set up within iTunes.
Open iTunes and select your iPhone: Launch iTunes. A small device icon representing the iPhone should appear near the top left of the iTunes window. Click this icon.
Navigate to the Summary section: In the sidebar on the left, click "Summary".
Choose backup options: Under the "Backups" section, ensure "This computer" is selected as the location for automatic backups.
CRUCIAL: Encrypting Your Local Backup (Why and How):
Why: As with Mac backups, encrypting backups on a PC via iTunes includes more data (Health, Activity, Keychain) and password-protects the backup file.
How: Select the checkbox for "Encrypt local backup" (or "Encrypt iPhone backup"). Users will be prompted to create and confirm a password. Click "Set Password".
WARNING: The same critical warning applies: this password must be remembered. Forgotten passwords render the backup inaccessible. Encrypted backups in iTunes are typically indicated by a lock icon in the list of backups.
Locating and managing PC backups: To see backups stored on the computer via iTunes, go to Edit > Preferences, then click the "Devices" tab. A list of device backups will be shown.
The decision to encrypt computer backups presents a trade-off: enhanced security and more comprehensive data inclusion versus the risk of permanent data loss if the encryption password is forgotten. Careful password management is therefore paramount. Computer backups also offer the potential for users to manually archive different backup versions by copying the backup folder from its storage location, providing a historical record that iCloud typically does not offer in the same way. This is an advanced benefit for those seeking meticulous version control.
V. Restoring Your iPhone From a Backup
Restoring an iPhone from a backup is typically done when setting up a new device or when attempting to resolve persistent software issues on an existing device by first erasing it.
Brief Overview of When and How to Restore from iCloud:
When: This method is used during the initial setup of a new iPhone or after an existing iPhone has been erased (Settings > General > Transfer or Reset iPhone > Erase All Content and Settings).
How: During the iPhone's setup assistant process, users will reach a screen titled "Transfer Your Apps & Data" (or similar). On this screen, select "From iCloud Backup." Sign in with the relevant Apple ID and password. A list of available iCloud backups will be displayed; choose the most recent or relevant one. The restoration process will then begin. A stable Wi-Fi connection and connection to a power source are essential throughout this process. It's important to understand that while the basic setup might complete relatively quickly, "Content like your apps, photos, music, and other information will continue to restore in the background for the next several hours or days, depending on the amount of information on your device". Managing expectations regarding this extended restore time is key.
A significant point for restoring an iCloud backup to an already set up device is that the device must first be erased of all its content. This "erase before restore" step is a prerequisite that users might not immediately realize and is a considerable action before data recovery can commence.
Brief Overview of When and How to Restore from a Computer Backup:
When: Similar to iCloud restores, computer backups are used when setting up a new iPhone or restoring an erased device.
How (Mac/Finder):
Connect the iPhone to the Mac.
Open a Finder window and select the iPhone from the sidebar.
A list of available backups on the Mac will appear. Choose the desired backup.
If the backup is encrypted, the password created at the time of backup will be required.
Click "Restore" and keep the iPhone connected until the process completes.
How (PC/iTunes):
VI. Troubleshooting Common iPhone Backup Problems (Apple Support Insights)
Even with careful steps, backup issues can sometimes arise. The following troubleshooting advice is based on common problems and solutions provided by Apple support.
A. iCloud Backup Issues:
"Not enough iCloud storage" – solutions: This is one of the most frequent hurdles.
Manage apps contributing to backup: As detailed earlier, selectively disable backups for apps that do not contain essential data. This is done via Settings > [your name] > iCloud > Manage Account Storage (or Storage) > Backups >, then toggle off apps.
Delete old/unneeded iCloud backups: If there are backups for old devices or redundant backups, they can be deleted to free up space. From the same Backups screen, select an old backup and tap "Turn Off and Delete from iCloud" (or "Delete & Turn Off Backup").
Delete other data from iCloud: Free up general iCloud storage by deleting unnecessary photos from iCloud Photos (if enabled), files from iCloud Drive, or old messages (if Messages in iCloud is on).
Upgrade iCloud storage plan: If space is consistently an issue, purchasing an iCloud+ storage plan is often the most straightforward solution.
Users on forums also report success by checking the "Next Backup Size" estimate (Settings > [your name] > iCloud > Manage Account Storage > Backups >) and ensuring it's less than the available space, sometimes by toggling off even small apps if the estimate seems incorrect.
Backup taking too long or failing (Wi-Fi issues, server issues):
Check Wi-Fi connection: Ensure the iPhone is connected to a stable and strong Wi-Fi network. Attempting the backup on a different Wi-Fi network can sometimes resolve issues. The device should also ideally be connected to power.
Check Apple's System Status page: Occasionally, Apple's iCloud services may experience outages. Checking Apple's official System Status webpage can confirm if there's a broader problem.
Ensure sufficient iCloud storage: Double-check that there is enough available storage in iCloud for the backup to complete.
Restore from iCloud backup failed:
Try another network: Network conditions can significantly impact restore operations. Attempting the restore on a different Wi-Fi network is a primary troubleshooting step.
Use an alternate backup: If multiple iCloud backups are available, try restoring from a different one.
Check software version: Ensure the iPhone's iOS is up to date. Sometimes a newer iOS version is required to restore a backup.
Repeated password prompts: If the backup contains purchases made with multiple Apple IDs, the system may repeatedly ask for passwords for each account. Enter them as requested, or tap "Skip this Step" if the password is unknown (though this may affect the restoration of those specific apps or purchases).
B. Computer Backup Issues:
Computer doesn't recognize iPhone:
Ensure the Mac or PC's operating system and iTunes (on PC/older Macs) or Apple Devices app (on newer Windows) are up-to-date.
Try a different USB cable and a different USB port on the computer.
If the device still doesn't appear in Finder or iTunes, Apple provides further specific guidance to address this.
"Not enough disk space" on computer:
Error messages (e.g., "backup corrupt or incompatible," "an error occurred"):
If an alert states "an error occurred," ensure the iPhone has the latest version of iOS.
If an alert indicates the "backup is corrupt or incompatible," ensure the computer's operating system is updated. If an error suggests the iOS software is too old to restore the backup, the device's iOS will need to be updated. If these steps don't work, that particular backup may be unusable, and an alternate backup (or an iCloud backup) should be tried. A corrupt backup often represents a dead end for that specific file.
Security software interference (Windows):
On Windows PCs, security software (antivirus, firewall) can sometimes interfere with iTunes or the Apple Devices app, preventing backups from completing or causing iTunes to become unresponsive. Temporarily disabling or reconfiguring the security software, or ensuring it's updated, may be necessary.
General tips for both iCloud and Computer backup issues:
Restart all devices: A simple restart of the iPhone and the computer (if applicable) can often resolve temporary glitches.
Update software: Keep iOS, macOS/Windows, and iTunes/Apple Devices app updated to their latest versions to ensure compatibility and access to bug fixes.
Contact Apple Support: If troubleshooting steps do not resolve the problem, contacting Apple Support directly is the recommended next step.
The process of troubleshooting backup failures often involves an iterative approach. Following the recommended steps methodically, one by one, is usually more effective than trying multiple fixes simultaneously. The source of a backup failure can stem from various components—the iPhone itself, the computer, the respective software, the network connection, or even Apple's services—and isolating the problematic element is a key part of successful troubleshooting.
VII. Final Recommendations: Best Practices for iPhone Backups
Safeguarding the data on an iPhone is an ongoing responsibility. Adopting a few best practices can significantly enhance data security and peace of mind.
Embrace Redundancy (The 3-2-1 Principle as a Guide): While not always explicitly detailed by Apple for consumer iPhone backups, the "3-2-1 backup rule" is a well-regarded principle in data protection: maintain at least three copies of your data, store these copies on two different types of media, and keep one copy off-site. For iPhone users, this can be practically approached by using both iCloud Backup (which is off-site) and regular computer backups (a different media type, locally stored). This dual approach, as Apple itself sometimes suggests , provides a robust safety net.
Regularity is Key: A backup is only as good as its recency. For iCloud users, enabling automatic backups ensures that data is typically saved daily without manual intervention, provided the conditions (Wi-Fi, power, locked screen) are met. For computer backups, establishing a routine—perhaps weekly, or before significant events like OS updates or travel—is crucial.
Verify Your Backups: Confirmation that a backup has completed successfully provides assurance.
For iCloud, periodically check the "Last successful backup" date in Settings > [your name] > iCloud > iCloud Backup.
For computer backups, ensure the backup process in Finder or iTunes completes without error messages and note the date of the last backup. While a full verification restore is not always practical, knowing the backup completed is a positive indicator.
Secure Your Apple Account: iCloud backups are intrinsically linked to an Apple ID. Protecting this account with a strong, unique password and enabling two-factor authentication is paramount. This not only secures the backup data but also other sensitive information associated with the Apple ID.
Pre-Transition Backups: Always perform a final backup before selling, trading in, or giving away an iPhone. After confirming the backup, ensure the device is properly erased by navigating to Settings > General > Transfer or Reset iPhone > Erase All Content and Settings. This protects personal data and prepares the device for its new owner. This positions backups not just as a reactive safety measure but as a proactive tool in managing the iPhone throughout its lifecycle.
Ultimately, the psychological benefit of knowing a backup has successfully completed and that data is secure cannot be overstated. By understanding the options, following the steps carefully, and adopting good backup habits, iPhone users can significantly reduce the anxiety associated with potential data loss and confidently enjoy their devices.
