Guide to Fixing a Phone Charging Port That's Not Working
My phone is not charging is the most common reason we get calls and visits to our shop
Three Sections
(easy) Read this bit first if your phone isn't charging - it'll solve 99% of customer issues
(easy) Infographic/flow chart section of you like pictorials or guides to follow
Detailed stuff about your phone not charging if you want more in depth diagnostics and info
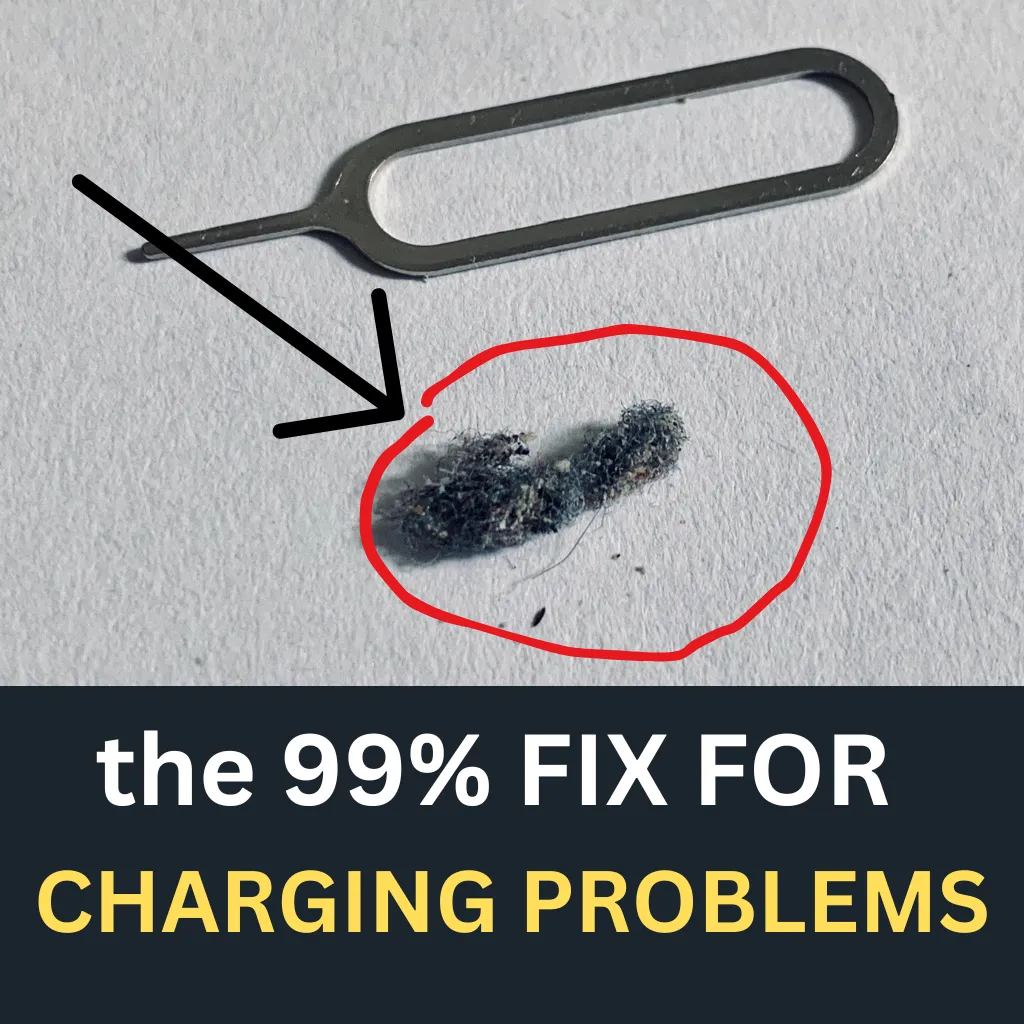
Read this bit first if your phone is not charging
Literally 99% of them are just dirt and debris and despite every customer telling me they've checked or they've cleaned it out - guess what - they haven't. And we literally never replace charging ports.
You are more than welcome to read all of this if it makes you feel better and to be honest it may help you diagnose a different issues gut realistically if your phone is not charging you need a pair of tweezers and a little bit of patience and you won't need a repair shop.
So this is the method to clean your charge port and your phone will likely charge.
Buy a pair of these tweezers on amazon
")
The best pair to use and the only ones as the nose on the three with a cross are too wide. You need long thin pointy ones.
The fix - this is how we make your phone charge again.
Literally all charging port problems that lead to a phone not charging are a build up of dirt and debris in the charging port and all you have to do it use a fine pair of tweezers to scrape the debris out.
I never do this but I recommend turning your phone off. You are poking metal onto an electrical contact point and it's better for the phone not you if it's off ( i have never tuned one off in 10 years but hey - do as I say not as I do)
No hold the phone firmly and poke the tweezers in scraping to the bottom of the port and you will feel dirt and debris - likely lint/pocket fluff tho if you are a farmer or mechanic it'll be soil or metal filings. Anyway scrape gently right to all the corners and then take the tweezers out and tap the phone on a surface, debris may fall out, keep repeating till you feel like it's clean, plug a charger in and see if it feels more solid, like the cable will stay in - if not repeat until it does.
Infographic/flow chart section of you like pictorials or guides to follow
I've created a simple guide and flowchart to help customers diagnose and fix phone/tablet charging port issues. The guide is designed to be easy to follow, starting with the most common and simple fixes before progressing to more complex solutions.
The flowchart provides a visual decision tree that customers can follow to systematically troubleshoot their charging problems. It leads them through checking cables and adapters first (which are often the actual culprits), then cleaning the port (the most common fixable issue), restarting the device, and checking for physical damage.
The written guide complements the flowchart with:
Detailed instructions for each troubleshooting step
Safety warnings about what tools to use and avoid
Clear signs of when professional help is needed
Prevention tips to avoid future problems
The most emphasized fix is cleaning the charging port, as this is frequently the solution to charging problems. Pocket lint, dust, and debris often accumulate in charging ports and prevent proper connections.

📱 Phone Not Charging?
🔌 DIY Fix-It Guide
🚨 Common Charging Issues:
🧦 Lint/Debris in Charging Port
⚡ Damaged Cable/Adapter
🐞 Software Glitches
🔩 Bent/Broken Port Pins
🔌 Faulty Power Source
🛡️ Safety & Tools:
Safety First:
1️⃣ Turn Off Your Phone
2️⃣ Use Good Lighting
3️⃣ Be Gentle — No Force!
Your Toolkit:
🔦 Flashlight
🪵 High Quality Tweezers
🖌️ Soft Brush (like a new toothbrush)
🔍 Optional: Magnifying Glass
🔧 Troubleshooting Flowchart:
✅ Step 1: Check Accessories & Power
Try another cable, adapter, outlet
Remove phone case
➡️ Fixed? 🎉 YES → DONE! ❌ NO → Step 2
🔄 Step 2: Restart Phone
Standard or force restart
➡️ Fixed? ✅ YES → DONE! ❌ NO → Step 3
🧼 Step 3: Clean Charging Port (Phone OFF)
Use tweezers to clean out the port. Scrape gently into the corners
Then tap the phone on a surface and repeat
Gently clean with brush
➡️ Fixed? ✅ YES → DONE! ❌ NO → Step 4
🔍 Step 4: Inspect the Port
Look for bent pins, corrosion, looseness
⚠️ May need magnifying glass for this
➡️ Fixed? ✅ YES → DONE! ❌ NO → Step 5
📲 Step 5: Software & Battery Checks
Install updates
Check battery health
(Android) Boot Safe Mode
(Last Resort) Factory Reset (Backup First!)
➡️ Fixed? ✅ YES → DONE! ❌ NO → Call the Pros
🆘 When to Call the Pros:
Severe damage, corrosion, or loose port
Heat, burning smell
You've tried everything — still no luck
You're not comfortable with DIY
💡 Tips to Prevent Future Issues:
Gently unplug cables (by the plug, not cord)
Avoid bending cables
Clean the port regularly
Use original/certified chargers
Use port covers if in dusty environments
Keep away from moisture/extreme temperatures
Detailed stuff about your phone not charging if you want more in depth diagnostics and info
Guide to Fixing a Phone Charging Port That's Not Working
It is a common and deeply frustrating experience: the phone, an essential tool for daily life, refuses to charge. This situation can lead to feelings of disconnect and anxiety, as access to communication, information, and entertainment is suddenly cut off. Many individuals immediately assume a serious hardware failure, anticipating costly repairs or even the need for a new device. However, a significant number of charging port problems stem from simple, easily rectifiable issues that do not require professional intervention or expensive solutions. This guide aims to empower domestic users with a clear, step-by-step approach to diagnose and resolve common charging port ailments, potentially saving time, money, and unnecessary worry.
The primary culprits behind a non-charging phone often fall into a few main categories. Debris accumulation is a very frequent cause, where pocket lint, dust, and other small particles become lodged in the charging port, physically obstructing the connection. Another common issue involves faulty accessories, such as damaged or incompatible charging cables and power adapters. Sometimes, software glitches within the phone's operating system can interfere with the charging process. Less frequently, minor physical damage to the port, like bent pins or a slightly loose connection from wear and tear, can be the source of the problem. Finally, the issue might not even be with the phone itself but with the power source, such as a faulty electrical outlet or an underpowered USB port. Understanding these common causes is the first step towards an effective solution.
Section 1: Before You Begin – Safety First and Gathering Your Tools
Before attempting any troubleshooting on a phone's charging port, prioritizing safety and gathering a few simple tools is crucial. These preparatory steps help prevent accidental damage to the device or injury.
Essential Safety Precautions:
Power Off Your Device: It is paramount to turn the phone completely off before cleaning or closely inspecting the charging port. This action minimizes the risk of electrical short circuits or further damage to the sensitive internal components.
Work in a Well-Lit Area: Good visibility is essential when dealing with small ports and delicate parts. A well-lit space allows for a clearer view, making inspection and cleaning more effective and safer.
Be Gentle: Charging ports are delicate mechanisms. It is important to remember that force should never be used when inserting or removing cables, or when attempting to clean the port. Applying excessive pressure can lead to bent pins or other damage.
Simple Tools You Might Need:
The tools required for most common charging port fixes are often readily available in many households or are inexpensive to acquire. This accessibility underscores that many solutions do not demand specialized technical equipment.
Flashlight: A small flashlight, or even the flashlight function on another phone, is invaluable for clearly inspecting the inside of the charging port for debris or damage.
Non-Metallic Tools for Cleaning:
Wooden or Plastic Toothpick: These are ideal for gently dislodging compacted debris from the port. Their non-metallic nature reduces the risk of shorting connections.
Brand New, Soft Toothbrush: A dry toothbrush with soft bristles can be used to gently brush out loose particles from the port.
Can of Compressed Air: This is very effective for blowing out dust and lint. It is important to use it in short bursts and keep the can upright to prevent propellants from entering the port as liquid.
Fine-tipped Tweezers (Non-Metallic Recommended): If non-metallic tweezers are available, they can be useful for carefully removing larger, visible pieces of debris. If using metallic tweezers, extreme caution must be exercised to avoid touching the contacts inside the port.
Magnifying Glass (Optional but helpful): For those who find it difficult to see small details, a magnifying glass can provide a closer, clearer view inside the port.
Cotton Swab (use with extreme care): While some sources suggest using a cotton swab, perhaps very slightly dampened with isopropyl alcohol for specific types of cleaning (like corrosion), it must be used cautiously to avoid leaving cotton fibers behind in the port. Dry methods are generally preferred for loose debris.
Equally important as knowing what tools to use is understanding what to avoid. Using inappropriate items can cause more harm than good. For instance, metal objects like needles, paper clips, or safety pins should never be inserted into the charging port, as they can easily scratch or bend the delicate internal pins or cause a short circuit. Similarly, blowing into the port with one's mouth is inadvisable, as breath contains moisture that can lead to corrosion and further damage. These proactive warnings are crucial for preventing users from inadvertently worsening the problem in a moment of frustration.
Section 2: Step-by-Step Troubleshooting Guide for Your Charging Port
With safety precautions understood and simple tools gathered, users can proceed with a logical sequence of troubleshooting steps. This section provides a progressive approach, starting with the simplest and most common solutions. To help navigate these steps, the following table offers a quick overview based on common symptoms.
Table 1: Quick Problem-Solver Checklist

Step 2.1: The Obvious Checks – Cable, Charger, and Power Source
Before assuming the phone's port is the problem, it is essential to rule out issues with external accessories and the power supply. These components are frequently the cause of charging failures and are relatively easy to test. Users often underestimate how frequently charging cables and adapters fail, particularly if they are older, heavily used, or lower-quality, uncertified products.
Inspect the Current Charging Cable and Adapter: Carefully examine the length of the charging cable for any visible signs of damage, such as frays, kinks, exposed wires, or sharp bends, especially near the connector ends. Check the metal connectors on both the cable and the power adapter for any bent pins, discoloration, or signs of wear. A cable or adapter that feels unusually warm during use, or only establishes a connection when held in a "just right" position, is a strong indicator of a fault.
Test with a Different, Known-Good Cable: This is a critical diagnostic step. The term "known-good" means a cable that reliably charges another compatible device. If a different, functional cable allows the phone to charge, the original cable is the culprit and should be replaced.
Test with a Different, Known-Good Charging Adapter: Similar to the cable, the power adapter (the "wall wart" that plugs into the outlet) can also fail. Test with an adapter that is confirmed to work with other devices.
Try a Different Power Outlet: Occasionally, the electrical outlet itself may be faulty or not supplying adequate power. Plug the charger into a different outlet to see if this resolves the issue.
Ensure Secure Connections: Double-check that the charging cable is firmly and securely plugged into the phone's port, the power adapter, and that the adapter is securely in the wall outlet. A loose connection at any of these points can prevent charging.
Consider the Power Source if Using a Computer: If charging via a computer's USB port, ensure the computer is powered on and not in sleep or hibernation mode. Try a different USB port on the computer, preferably one located directly on the motherboard (often found on the rear of a desktop PC) rather than a USB hub or a port on the front panel, as these may provide insufficient power.
Remove the Phone Case: Some bulky or ill-fitting phone cases can physically obstruct the charging cable from making a complete and secure connection with the port. Temporarily remove the case and try charging again.
If these checks identify a faulty accessory, replacing it with a quality, certified product is recommended to ensure reliable charging and prevent potential damage to the phone.
Step 2.2: A Simple Restart – The Universal Fix?
While it might seem counterintuitive for a problem that appears to be physical, a simple software restart can sometimes resolve charging issues. The phone's operating system manages the charging process, and minor software bugs or temporary glitches can occasionally interfere with its ability to recognize the charger or initiate charging.
Perform a Standard Restart: Turn the phone off using its normal power-down sequence, wait a few moments, and then turn it back on. This process can clear temporary software conflicts.
Consider a Force Restart (If Necessary): If the phone is unresponsive or a standard restart doesn't help, a force restart might be required. The method for a force restart varies by device model but typically involves holding a combination of buttons (e.g., power button and volume down button) for an extended period (10-30 seconds) until the device restarts. It is advisable to search online for the specific force restart procedure for the particular phone model.
Test Charging After Restart: Once the phone has rebooted, connect the charger and see if it begins to charge.
A restart is a quick, non-invasive step that should always be attempted. Beyond clearing direct charging-related software glitches, a restart also closes all running applications. Some resource-intensive apps running in the background can consume power at a rate that makes it seem as though the phone is charging very slowly or not at all, even if the charging hardware is functioning correctly. A restart can address this by providing a cleaner slate for the charging process.
Step 2.3: Cleaning the Port – Evicting Dust and Debris
One of the most common, and often surprisingly effective, solutions for a non-charging phone is to clean the charging port. Over time, these small openings are notorious for accumulating pocket lint, dust, crumbs, and other debris. This buildup can form a surprisingly dense blockage, preventing the charging cable from inserting fully and making a solid electrical connection. Users often report that repeatedly trying to insert the cable can inadvertently compact this debris further, making the problem worse.
Safety First: Before attempting to clean the port, reiterate the importance of powering off the phone completely.
Visual Inspection: Use a bright flashlight to carefully look inside the charging port. A magnifying glass can be very helpful for this step, allowing for a clearer view of any lodged particles.
Cleaning Methods (Gentle Approach First):
The goal is to remove debris without damaging the delicate pins or contacts within the port.
Compressed Air: This is often the safest first method. Hold the can of compressed air upright and use several short bursts to blow into the port. This can dislodge and expel loose dust and lint.
Soft Brush / New Toothbrush: A small, dry, soft-bristled brush (like a new, soft toothbrush or an anti-static electronics brush) can be used to gently sweep out any remaining visible debris.
Wooden or Plastic Toothpick: If compressed air and a brush are insufficient, a wooden or plastic toothpick can be used for more targeted cleaning. Carefully and gently scrape around the inside walls of the port, being extremely cautious to avoid touching or pressing on the central block of pins or contacts. The aim is to loosen and scoop debris out, not to push it further in. Work slowly to prevent the toothpick from breaking off inside the port. After scraping, some users find it helpful to gently tap the phone, port-side down, onto a hard surface to help dislodge the loosened debris.
Cotton Swab (with extreme caution): While some sources suggest using a cotton swab very slightly dampened with isopropyl alcohol, particularly for signs of corrosion (greenish build-up), this method carries risks. If attempted, the swab must be barely damp, not wet, and great care must be taken to ensure no cotton fibers are left behind in the port. For common loose debris, dry cleaning methods are generally safer and preferred.
What to AVOID During Cleaning:
Metal Objects: Absolutely avoid using metal needles, pins, paper clips, or any sharp metallic object. These can easily scratch, bend, or break the delicate charging pins or cause an electrical short.
Blowing with Your Mouth: Saliva contains moisture and particles that can cause corrosion or introduce more contaminants into the port.
Excessive Force: Never force any tool into the port. If debris is tightly packed, gentle and patient maneuvering is key.
Table 2: Safe Cleaning Tools & Techniques

After cleaning, attempt to charge the phone again. It is remarkable how often this simple procedure resolves charging issues, as evidenced by numerous user accounts and technician observations where "pocket lint" was the sole culprit. The type of debris can vary; while lint is common, sticky residues or even early signs of corrosion might be present, potentially requiring a more careful approach or even professional attention if cleaning is ineffective.
Step 2.4: Visual Inspection – Looking for Physical Damage
If cleaning the port does not resolve the charging issue, the next step is to carefully inspect the port for any signs of physical damage. This should be done with the phone powered off and in a well-lit area, using a flashlight and, if available, a magnifying glass for a closer look.
Look for Bent, Broken, or Misaligned Pins: The charging port contains a series of small metal pins or a central tongue (depending on the port type, e.g., USB-C, Lightning) that make contact with the cable. Carefully examine these for any that appear bent out of shape, pushed in, broken off, or misaligned compared to the others. These pins are critical for data and power transfer.
Check for a Loose Port Assembly: Gently (very gently) wiggle the charging cable when it is inserted into the port (ensure it is not connected to power for this check). If the entire port assembly itself feels loose, wobbly, or moves excessively within the phone's casing, this indicates an internal physical problem. Symptoms like the phone only charging when the cable is held in a specific orientation, or if the cable feels unusually loose and doesn't "click" in securely, often point to a loose or damaged port. This looseness can be due to wear and tear from repeated insertions or from incidents like roughly pulling the cable out.
Look for Signs of Corrosion or Discoloration: Green, white, or blackish deposits or discoloration inside the port can be a sign of liquid damage or corrosion, which can impede electrical connections.
Attempting Pin Realignment (Extreme Caution Advised): If a pin appears to be slightly bent and is clearly visible, it might be possible to very gently nudge it back into its correct position using a fine, non-conductive tool like a wooden or plastic toothpick. This action carries significant risk. The pins are extremely delicate, and applying too much force or incorrect pressure can easily break them or cause further damage. If there is any doubt, or if pins are badly bent, broken, or appear to be pushed deep into the port, do not attempt this step. Professional assistance is the safer option in such cases.
Physical damage to the charging port often results from accidental drops while the cable is plugged in, forceful or incorrect insertion of the cable, or simply long-term wear. Some phone models may also have charging ports that are known to be more susceptible to wear or damage over time.
Step 2.5: Software and Battery Health Checks (If Symptoms Persist)
If the charging cable, adapter, and power source have been verified as working, the port has been cleaned, and no obvious physical damage is apparent (or minor issues have been addressed without success), then software or battery health could be contributing factors. These are particularly relevant if the symptoms include very slow charging, the phone not holding a charge, or erratic charging behavior.
Check for Software Updates: Outdated operating system software can sometimes lead to charging or battery performance anomalies. Manufacturers often release updates that include bug fixes and performance improvements, which might address charging-related issues. Navigate to the phone's settings menu (typically under "System," "About Phone," or "Software Update") to check for and install any available updates. While updates are generally beneficial, it is worth noting that, in rare instances, a newly installed update can introduce unforeseen bugs that might temporarily affect charging, though this is less common than an update providing a fix.
Assess Battery Health: All rechargeable batteries degrade over time, losing their capacity to hold a full charge and to charge efficiently. This degradation can manifest as symptoms easily confused with a faulty charging port, such as the phone charging very slowly or the battery draining rapidly even after being charged.
For iPhones: Apple provides a direct way to check battery health. Go to Settings > Battery > Battery Health & Charging. The "Maximum Capacity" percentage indicates the battery's current capacity relative to when it was new. Apple generally recommends considering a battery replacement if this capacity drops to 80% or lower.
For Android Phones: The availability of a direct battery health percentage varies by manufacturer and Android version. Some manufacturers include it in the settings menu (often under "Battery" or "Device Care"). Third-party diagnostic apps may also offer insights into battery health, but their accuracy can vary. If the phone is several years old and has undergone many charge cycles, natural battery degradation is a likely contributor to charging woes. A user on a forum noted their phone's "dying battery became too obnoxious," distinct from their port issues, highlighting how these can be separate or co-occurring problems.
Advanced Software Troubleshooting (Use with Caution): These steps are more involved and should be considered carefully, particularly as a factory reset involves data loss.
Boot into Safe Mode (Primarily for Android): Safe Mode starts the phone with only the original, essential system applications running, disabling all third-party apps. If the phone charges normally in Safe Mode, it suggests that a downloaded app is interfering with the charging process. The user would then need to uninstall recently added or suspicious apps one by one (starting with the most recent) to identify the culprit. The procedure to enter Safe Mode varies by device but often involves pressing and holding the power button, then long-pressing the "Power off" option on the screen.
Factory Reset (Last Resort): A factory reset erases all user data and settings from the phone, returning it to its original out-of-the-box software state. This can resolve deep-seated software problems that persist through other troubleshooting steps. However, it is a drastic measure and should only be performed after backing up all important data. If the phone won't turn on at all or exhibits severe software-related charging problems that no other step has fixed, a factory reset might be considered before seeking professional repair.
Check for Optimized Charging Settings: Many modern smartphones include features designed to prolong battery lifespan, such as "Optimized Battery Charging" (iOS) or similar adaptive charging settings (Android). These features may intentionally slow down charging, particularly overnight, to reduce stress on the battery. Ensure that such a feature, if active, is not being misinterpreted as a charging fault. These settings can usually be adjusted in the battery settings menu.
The interaction between a phone's charging hardware (port, battery) and its software is complex. A software glitch might prevent the phone from correctly recognizing that a charger is connected, or it might misreport the battery's charge level, even if the physical components are perfectly fine.
Section 3: When to Wave the White Flag – Knowing When to Seek Professional Help
While many charging port issues are resolvable with the DIY steps outlined above, there are situations where attempting further fixes at home is either unlikely to succeed or risks causing more significant damage. Recognizing these limits is crucial for making an informed decision about seeking professional assistance. The desire to save on repair costs is understandable , but a botched DIY attempt on a complex issue can lead to more expensive problems down the line, including irreversible damage to the phone's mainboard.
Clear Signs It's Time for a Professional:
Persistent Issues After All Steps: If all the troubleshooting steps in Section 2 have been carefully followed and the phone still refuses to charge or charges erratically, the problem likely lies beyond simple fixes.
Visible Severe Physical Damage: If inspection reveals obvious cracks in the port housing, multiple badly bent, broken, or missing internal pins, or if the entire port assembly is very loose and wobbly, professional repair is almost certainly needed. Some users describe ports becoming "dislodged".
Suspected Water Damage: If the phone has been exposed to liquid (even if it seemed minor) and charging problems began afterward, or if there are visible signs of corrosion (green or white powdery residue) inside the port, it requires professional attention. Water damage can cause complex and progressive issues that DIY cleaning cannot fully address.
Phone Overheats Significantly or Emits a Smell During Charging Attempts: If the phone or charger becomes excessively hot when attempting to charge, or if there's a smell of burning electronics, unplug it immediately. This could indicate a short circuit or another serious internal fault that poses a safety risk. One user reported they "could actually smell electrical burning".
If You're Uncomfortable or Unsure: If at any point the troubleshooting steps feel too complex, or if there's a concern about causing more damage, it is always wiser to stop and consult a professional.
The Risks of Complex DIY Repairs:
Replacing a charging port on most modern smartphones is not a simple task. These components are often soldered to the phone's main circuit board (motherboard) and require specialized tools, micro-soldering skills, and a deep understanding of electronics disassembly and reassembly. Many contemporary phones are also sealed with strong adhesives, making them difficult to open without causing damage to the screen or back panel. While some older or modular phones (like early Fairphone models ) or certain specific models (like the LG V60, where some users report successful DIY port board replacements ) might offer more accessible internal repairs for technically inclined individuals, this is not the norm for the average domestic user with a typical smartphone.
What to Expect from a Professional:
Reputable phone repair technicians have the correct diagnostic tools, high-quality replacement parts, and the expertise to safely open devices and perform delicate repairs like port replacement. They can accurately diagnose whether the issue is indeed the port, the battery, or a problem on the motherboard itself.
Table 3: DIY vs. Professional Repair – When to Make the Call
In situations where professional repair of the charging port is deemed too expensive or inconvenient, and if the phone supports it, wireless charging can serve as a viable alternative or workaround, bypassing the physical port entirely.
Section 4: Prevention is Better Than Cure – Keeping Your Charging Port Healthy
Preventing charging port problems in the first place is always preferable to dealing with repairs. Adopting a few good habits can significantly extend the life of a phone's charging port and reduce the likelihood of encountering issues. Many problems arise from user habits related to cable handling and the phone's environment.
Handle Cables with Care:
When unplugging the charging cable, always grip and pull from the sturdy plastic plug connector itself, not from the cord. Pulling on the cord puts strain on the internal wires and the connection point within the plug, and can also stress the phone's port if done at an angle.
Avoid bending cables sharply, especially right at the connector ends where the cable meets the plug. Such bends weaken the internal wiring over time.
Do not use excessive force when plugging the cable into the phone. It should insert smoothly. If it doesn't, check for obstructions or misalignment rather than forcing it.
When storing cables, coil them loosely rather than wrapping them tightly around objects or kinking them. This helps preserve the integrity of the wires and connectors.
Perform Regular Gentle Cleaning: Periodically inspect the charging port for any visible lint or dust. A quick puff of compressed air (used correctly) or a gentle sweep with a soft, dry brush every few weeks can prevent significant debris buildup. This is particularly important if the phone is frequently carried in a pocket or bag where lint is prevalent.
Use Quality/Certified Accessories: Whenever possible, use the original charger and cable that came with the phone, or choose high-quality, certified third-party accessories from reputable brands. Poorly made or uncertified cables and chargers may not fit correctly, can provide unstable power, and in some cases, can even contribute to port damage or electrical issues.
Consider Port Covers or Dust Plugs: For individuals who work in dusty environments or consistently find their phone's port collecting lint, a simple silicone or plastic dust plug can offer an effective barrier. Some phone users recall that older devices often came with such protective plugs.
Avoid Moisture and Extreme Temperatures: Keep the phone, and especially its charging port, away from liquids and environments with very high humidity. Also, avoid exposing the phone to extreme temperatures (both hot and cold), as these can affect battery performance and potentially damage sensitive components over time.
Be Mindful During Charging: Avoid putting unnecessary physical stress on the charging port while the phone is plugged in. For example, using the phone extensively in a way that constantly flexes or pulls the cable at the port can contribute to wear and tear.
While users cannot change the inherent design of their phone's charging port, which in some models might be more prone to wear or debris accumulation , adopting these preventative habits becomes even more critical for maximizing the port's lifespan and reliability. Simple environmental awareness, like not placing a phone port-down in a known linty pocket, can be a surprisingly effective measure.
Section 5: Conclusion – Powering Through Charging Problems
A phone that refuses to charge can be a significant source of frustration, but as this guide has illustrated, the solution is often within reach of the average domestic user. The most frequent culprits – accumulated debris in the charging port, faulty cables or adapters, and minor software glitches – can typically be addressed with patience, a few simple tools, and a methodical approach.
The key troubleshooting steps involve systematically checking the external accessories (cable, charger, power source), performing a device restart, carefully cleaning the charging port, and visually inspecting for any obvious physical damage. Many users have found, much to their relief and surprise, that a thorough cleaning to remove compacted lint or debris is all that is needed to restore their phone's charging capability.
However, it is equally important to recognize the limitations of DIY fixes. Severe physical damage to the port, issues arising from liquid exposure, or problems that persist despite diligent troubleshooting usually warrant professional attention. Attempting complex repairs without the necessary skills and tools can lead to further, more costly damage.
Ultimately, understanding the common causes of charging port failure and knowing how to safely address them can be an empowering experience. By following the steps outlined and practicing good preventative care, users can often overcome charging problems themselves, keep their devices functioning reliably, and potentially avoid unnecessary expense and inconvenience. This knowledge transforms a moment of panic into an opportunity for a satisfying and successful fix.
