
WE ARE OPEN Monday 9-6, Tuesday 9-5, Wednesday 9-5, Thursday 9-6, Friday 9-5, WE DO NOT OPEN WEEKENDS
"No Service": A Comprehensive Guide to Fixing Signal Issues on Your iPhone and Android
That dreaded "No Service" or "Searching..." message in your phone's status bar can bring your connected life to a screeching halt. No calls, no texts, no mobile data – it's a modern-day frustration. But before you panic or rush to a repair shop, there's a whole arsenal of troubleshooting steps you can take, often resolving the issue right from your own home. This guide will walk you through the fixes, from the simplest checks to understanding more complex hardware problems, for both iPhone and Android devices.
I. The "No Service" Enigma: Why Does It Happen?
The "No Service" message indicates your phone is unable to connect to your carrier's cellular network. This isn't just a single problem, but rather a symptom with a multitude of potential causes. These can range from being in a poor coverage area to software glitches, SIM card problems, incorrect settings, or even hardware malfunctions within the phone itself.
Understanding that a variety of factors can lead to this issue is the first step in systematically diagnosing and resolving it.
II. First Responders: Easy Fixes and Initial Checks for All Devices
Often, the simplest solutions are the most effective. Before diving into more complex troubleshooting, these initial steps can quickly resolve many "No Service" scenarios on both iPhones and Android devices. These methods address common, easily reversible causes of network connectivity loss.
A. Check Your Location and For Known Outages
The most straightforward reason for "No Service" is being outside your carrier's coverage area or in a location with poor signal penetration, like deep indoors, basements, or rural areas.
Verify Coverage: Check your carrier's coverage map, often available on their website, to ensure you're in a serviced zone. Move Locations: Try moving to a different spot, preferably outdoors or near a window, to see if the signal returns. Check for Outages: Sometimes the issue isn't your phone but a temporary network outage in your area. Your carrier might post updates on their website or social media. Friends or family on the same network nearby experiencing similar issues can also indicate an outage.
B. Restart Your Device: The Universal Fix-It
A simple restart can clear temporary software glitches or minor errors that might be preventing your phone from connecting to the network.
This action refreshes the device's operating system and its connections.
iPhone:
Standard Restart (most models):
Press and hold the side (or top) button until the power-off slider appears. Drag the slider, then wait for your iPhone to turn off. Once off, press and hold the side (or top) button again until you see the Apple logo.
Force Restart (if unresponsive):
For iPhone 8 or later (including iPhone SE 2nd & 3rd gen): Press and quickly release the volume up button. Press and quickly release the volume down button. Then, press and hold the side button until you see the Apple logo.
For iPhone 7 or iPhone 7 Plus: Press and hold both the side (or top) button and the volume down button until you see the Apple logo.
For iPhone 6s or earlier (including iPhone SE 1st gen): Press and hold both the side (or top) button and the Home button until you see the Apple logo.
Android:Standard Restart: Press and hold the power button until the power menu appears. Tap "Restart." If "Restart" isn't available, tap "Power off" and then turn your phone back on. Some Android models might use a combination of power and volume buttons to bring up this menu or force a restart.
C. Toggle Airplane Mode: A Quick Network Reset
Toggling Airplane Mode on and then off forces your phone to disconnect from all wireless radios (cellular, Wi-Fi, Bluetooth) and then re-establish those connections. This can often resolve minor connectivity hiccups.
iPhone:
Go to Settings > Airplane Mode and toggle the switch on. Alternatively, open Control Center (swipe down from the top-right corner on iPhones with Face ID, or swipe up from the bottom on iPhones with a Home button) and tap the Airplane Mode icon.Wait about 15-30 seconds. Toggle Airplane Mode off again.
Android:Go to Settings > Network & internet (or Connections) and toggle Airplane mode on. Alternatively, swipe down from the top of the screen to open the Quick Settings panel and tap the Airplane mode icon. Wait about 10-30 seconds. Toggle Airplane mode off again.Interestingly, Android devices can remember your Wi-Fi and Bluetooth state when Airplane Mode was last used. So, if you had Wi-Fi on while in Airplane Mode previously, it might turn on automatically the next time you enable Airplane Mode.
D. Check for Software Updates: Keeping Things Current
Outdated operating system software can sometimes lead to compatibility issues with carrier networks or contain bugs affecting connectivity.
Manufacturers release updates to fix bugs and improve performance, including network-related functions.
iPhone (iOS Updates):
Ensure your device is connected to Wi-Fi and preferably plugged into power. Go to Settings > General > Software Update. If an update is available, you'll see an option to "Download and Install" or "Install Now". You can also set up automatic updates.
Android (OS Updates):Ensure your device is connected to Wi-Fi.Go to Settings > System > Software update (or System update, path may vary slightly by manufacturer, e.g., "About phone > Software updates"). Tap "Check for updates" or a similar option.If an update is available, follow the on-screen prompts to download and install it. Also, check for Google Play system updates via Settings > Security & privacy > System & updates > Google Play system update. It's worth noting that update availability and schedules can vary by device manufacturer and mobile carrier on Android. If your device indicates "not enough space available" for an update, you'll need to free up storage.
E. Check for Carrier Settings Updates (Primarily iPhone):
Carrier settings are small files from your mobile network provider (like Verizon, AT&T, T-Mobile) that update your iPhone's ability to connect to their network for services like calling, data, messaging, and hotspot access.
These updates can improve connectivity, performance, and add support for new features like 5G or Wi-Fi Calling.
While these usually install automatically, you can manually check.
iPhone:
Ensure your iPhone is connected to Wi-Fi or a cellular network.Go to Settings > General > About. If an update is available, a prompt will appear within about 15 seconds. Follow the on-screen instructions to install it. If you dismiss the notification, this manual check is the way to find it again. If you insert a new SIM or set up an eSIM, you might need to download new carrier settings. To see the current version, go to Settings > General > About and look next to "Carrier".
F. Ensure Cellular Data is On (and Check Roaming if Traveling):
It might seem obvious, but cellular data can be accidentally turned off.
iPhone: Go to Settings > Cellular (or Mobile Data). Ensure Cellular Data (or Mobile Data) is toggled on. If traveling internationally, check Cellular Data Options > Data Roaming is enabled, but be aware of potential charges.
Android: Go to Settings > Network & internet (or Connections) > SIMs (or Mobile network). Ensure Mobile data is toggled on. If it's already on, try toggling it off and on again. Check data roaming settings if applicable, usually found under the mobile network settings.
These initial checks are quick, non-invasive, and often resolve "No Service" issues without needing to delve deeper. They address the most common culprits: temporary glitches, incorrect basic settings, or environmental factors.
III. The SIM Card Saga: Your Phone's Identity Crisis
Your Subscriber Identity Module (SIM) card is a tiny chip that connects your phone to your carrier's network, authenticating your device and allowing access to your subscribed services.
If your phone says "No SIM," "Invalid SIM," or persistently shows "No Service," the SIM card itself or its connection to the phone could be the problem. Troubleshooting the SIM card is a crucial step in diagnosing network issues.
A. Remove, Inspect, Clean, and Reinsert the SIM Card
Physical issues with the SIM card or its tray can interrupt communication between the card and the phone.
Power Off Your Device (Recommended): While not always strictly necessary for modern phones, powering off your device before removing or inserting a SIM card is a good precaution to prevent any potential short circuits or data corruption.
Locate and Open the SIM Tray:iPhone: The SIM tray is usually on the side of the iPhone. It looks like a thin oval with a small pinhole. Android: The SIM tray location varies – it can be on the side, top, or sometimes under the back cover or battery (on older models). Use a SIM ejector tool (often included with your phone) or a small, unbent paperclip to gently push into the pinhole to eject the tray. Do not force it.
Inspect the SIM Card and Tray: Carefully remove the SIM card from the tray. Look for any visible signs of damage on the SIM card's gold contacts, such as scratches, corrosion, chips, or discoloration. Check for dirt, dust, or debris on the SIM card and inside the SIM tray. Inspect the SIM tray itself for any damage or deformation.
Clean the SIM Card (If Necessary): If the SIM card appears dirty, gently wipe the gold contacts with a clean, dry, lint-free microfiber cloth. For more stubborn grime, you can use a cotton swab lightly dampened with a solution of 50/50 isopropyl alcohol (at least 90% purity) and distilled water, or just isopropyl alcohol. Ensure the card is completely dry before reinserting it. Avoid using water alone or excessive force.
Reinsert the SIM Card:Align the SIM card correctly in the tray. SIM cards usually have a notched corner to ensure they only fit one way. Carefully slide the tray back into the phone until it clicks into place, ensuring it's in the same orientation it was removed. Power On and Test: Turn your phone back on and see if the "No Service" issue is resolved.
This process of physically reseating the SIM card can often fix connection problems caused by a slightly dislodged card or dirty contacts. It's a fundamental step because the SIM card is the primary key your phone uses to identify itself to the cellular network.
B. Testing the Waters: SIM in Another Phone, Another SIM in Your Phone
This cross-testing method is invaluable for pinpointing whether the issue lies with your SIM card, your phone, or potentially your carrier account.
Test Your SIM Card in a Different, Compatible Phone:
Carefully remove your SIM card and insert it into another phone that is known to be working and is compatible with your SIM card type and carrier (ideally an unlocked phone or one locked to the same carrier). If your SIM card works in the other phone: This suggests the problem likely lies with your original phone's hardware (e.g., SIM reader, antenna, baseband) or a more persistent software issue on your device.
If your SIM card does NOT work in the other phone (and that phone works with its own SIM): This strongly indicates your SIM card is faulty or there's an issue with your carrier account/provisioning tied to that SIM. Test a Different, Known-Good SIM Card in Your Phone:
Obtain a SIM card from another person that you know is working correctly (and is compatible with your phone, ideally from the same carrier or an unlocked phone).Insert this known-good SIM into your phone.If the known-good SIM works in your phone: This points to your original SIM card being the culprit (damaged, deactivated) or an issue with your specific account provisioning for that SIM.
If the known-good SIM does NOT work in your phone: This suggests the issue is more likely with your phone's hardware or a deeper software problem on your device.
This diagnostic approach helps narrow down the source of the "No Service" problem significantly. If your SIM works elsewhere but not in your phone, the phone is suspect. If your SIM doesn't work in any phone, the SIM or carrier service is suspect. If another SIM works in your phone, your original SIM or service is suspect. This logical process of elimination is key before moving to more drastic measures or contacting support.
C. For eSIM Users: Different Approach, Similar Goals
If your phone uses an eSIM (embedded SIM) instead of a physical SIM card, the troubleshooting steps are slightly different as there's no physical card to remove or clean.
Restart your device: This is often enough to refresh the eSIM's functions.
Check eSIM activation: Ensure your eSIM profile is correctly downloaded and activated. This usually involves scanning a QR code provided by your carrier or entering details manually.
Contact your carrier: If you suspect an eSIM issue (e.g., "No SIM" errors with an active eSIM plan, or problems after deleting and trying to re-add an eSIM profile), you'll typically need to contact your carrier. They can verify the eSIM is correctly provisioned on your account, help re-download the profile, or generate a new one if needed. Problems can arise if the eSIM profile on the device doesn't match the one in the carrier's system or if a previous eSIM profile wasn't properly removed before adding a new one.
IV. Digging Deeper: Advanced Software Troubleshooting
If the initial checks and SIM card troubleshooting haven't resolved the "No Service" issue, it's time to explore more advanced software-based solutions. These steps involve resetting certain configurations on your device or manually selecting network options.
A. Reset Network Settings: A Clean Slate for Connections
Resetting network settings erases all current network configurations and returns them to their factory defaults. This can often resolve stubborn connectivity issues caused by corrupted settings or misconfigurations. It's a more targeted reset than a full factory reset, as it doesn't delete your personal data, apps, or media.
However, it does remove saved Wi-Fi networks and passwords, paired Bluetooth devices, VPN configurations, and custom cellular settings.
What is Erased?
Wi-Fi Networks and Passwords: You'll need to re-enter passwords for all previously saved Wi-Fi networks. Bluetooth Pairings: All paired Bluetooth devices will be forgotten and need to be re-paired. VPN Settings: Configured VPN profiles will be removed.
Cellular Settings: APN (Access Point Name) settings, preferred network types (e.g., 5G/LTE/3G selection), and cellular data roaming options will be reset to default. For iPhones, the device name in Settings > General > About is reset to "iPhone," and manually trusted certificates are changed to untrusted. eSIMs are NOT Deleted: Importantly, resetting network settings does not delete your eSIM profiles. The eSIM is stored in a secure element separate from these network configurations. Only a full factory reset or manual deletion from settings would remove an eSIM.
Precautions:Note Wi-Fi Passwords: Before resetting, make sure you know the passwords for Wi-Fi networks you regularly use, as you'll need to re-enter them. Custom APN/Carrier Settings: If you've manually configured APN settings (sometimes required for smaller carriers or MVNOs), these will be erased. You may need to get these settings from your carrier again.How to Reset Network Settings:
iPhone:Go to Settings > General > Transfer or Reset iPhone. Tap Reset. Tap Reset Network Settings. Enter your passcode if prompted, and confirm the reset. Your iPhone will restart.
Android:The path can vary slightly by manufacturer. Generally: Go to Settings > System (or General management) > Reset (or Reset options). Tap Reset Wi-Fi, mobile & Bluetooth or Reset network settings. Confirm the action. You may need to enter your PIN, pattern, or password. Your phone may restart.On Samsung devices, the path is typically Settings > General management > Reset > Reset network settings. You might be asked to choose a SIM if you have more than one.
Resetting network settings is often a very effective step because it clears out potentially problematic configurations that have accumulated over time or were altered by an app or update, without the drastic measure of a full factory reset. It gives your phone's network components a fresh start.
B. Manually Select Network Operator
Normally, your phone automatically selects the best available network. However, if it's struggling to connect, or if you're in an area with multiple network options (like when roaming), manually selecting your carrier can sometimes force a connection.
iPhone:
Go to Settings > Cellular (or Mobile Data). Tap on Network Selection. (This option may only appear when roaming internationally or if automatic selection is failing ). Toggle the Automatic switch off. Your iPhone will search for available networks. This may take a few moments.Select your carrier's network from the list.If you manually select a network, your phone will only use that network. If you move out of its coverage area, you'll lose service. It's generally recommended to switch back to Automatic when you're back in your home area or if the manual selection doesn't help.
Android:Go to Settings > Connections (or Network & internet) > Mobile networks (or SIMs then select the SIM). Tap Network operators. Toggle off Select automatically (or similar wording) or choose Manual. Your phone will scan for available networks.Select your carrier from the list.Like with iPhones, it's often best to return to automatic selection once troubleshooting is complete or if you change locations.
C. Check Date and Time Settings (Especially After Travel)
Incorrect date and time settings, particularly if they are manually set and you've traveled across time zones, can sometimes interfere with network authentication.
iPhone: Go to Settings > General > Date & Time. Ensure Set Automatically is toggled on. This requires an internet connection (Wi-Fi if cellular isn't working) to sync. Android: Path may vary, but typically Settings > System (or General management) > Date & time. Ensure Automatic date & time and Automatic time zone are enabled.
D. (iPhone Specific) Switch Between 4G/LTE and 3G (If Available)
For older iPhones or in areas with spotty newer network coverage, sometimes switching to an older network standard can provide a more stable, albeit slower, connection.
Go to Settings > Cellular > Voice & Data.Try switching between 5G Auto, 5G On, LTE (or 4G), and if available, 3G to see if service is restored. Modern iPhones and networks are phasing out 3G, so this option may not be present or effective.
These advanced software steps address more persistent issues by resetting specific configurations or giving you more direct control over network selection. If these fail, the problem might be beyond simple software tweaks.
V. Calling for Backup: When to Contact Your Mobile Provider
If you've diligently worked through the self-help steps – restarting, checking your SIM, toggling settings, resetting network configurations – and the "No Service" ghost still haunts your device, it's time to contact your mobile provider. They have access to account-level information and network-side diagnostics that you don't.
A. When is it Time to Call?
You should contact your carrier if:
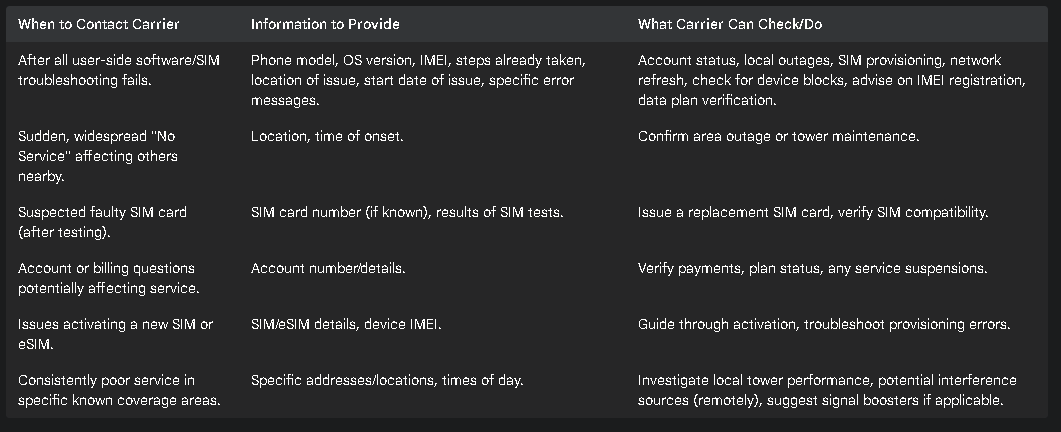
All the user-side software and SIM troubleshooting steps have failed to restore service. You suspect a faulty SIM card after testing it in another phone or another SIM in your phone. There's a sudden, widespread "No Service" issue affecting others on the same network in your immediate area (suggesting a local tower outage). You have questions about your account status (e.g., unpaid bills, suspended service) that might be impacting connectivity. You're having trouble activating a new SIM or eSIM. You experience consistently poor service in specific locations where coverage should be good according to their maps.
B. Information to Have Ready Before Calling
To make the support call more efficient, gather the following information beforehand:
Your Phone Model and Operating System Version: (e.g., iPhone 14 Pro with iOS 17.3, Samsung Galaxy S23 with Android 14). Your Account Information: Account number or phone number associated with the service.IMEI Number of Your Device:Dial *#06# (if it works). iPhone: Settings > General > About > IMEI.Android: Settings > About Phone > IMEI information (path may vary). A Clear Description of the Problem: When did it start? Is it intermittent or constant? What error messages do you see (e.g., "No Service," "Searching," "SOS only," "Invalid SIM")?. Location(s) Where the Issue Occurs: Is it everywhere or only in specific places?Troubleshooting Steps Already Taken: Let them know what you've already tried (restarts, SIM checks, network reset, etc.). This saves time and helps them avoid suggesting redundant steps.SIM Card Number (ICCID): If the issue might be SIM-related, this can be found printed on the SIM card itself or in iPhone settings under Settings > General > About > ICCID.
Approaching carrier support with comprehensive information allows them to quickly access relevant account and network data, bypassing basic troubleshooting and moving towards more specific diagnostics.
C. What Your Carrier Can Do
Your mobile provider has several tools and checks at their disposal:
Verify Account Status: They can confirm your account is active, in good financial standing, and that there are no service blocks or suspensions. Check for Local Network Outages: They can confirm if there's known maintenance or an outage affecting cell towers in your area. SIM Card Provisioning and Health: They can check if your SIM card is correctly provisioned on their network. They can send a "refresh" signal to your SIM/device, which can sometimes re-establish a proper connection.Issue a Replacement SIM Card: If your SIM card is determined to be faulty or outdated (e.g., an old SIM not fully compatible with newer network technologies like 5G), they can issue a replacement. eSIM Troubleshooting: For eSIM users, they can help with activation, re-downloading profiles, or generating new eSIM profiles if the current one is corrupted or was accidentally deleted. Check for Device Blocks/Barring: Confirm your device's IMEI isn't blacklisted (e.g., reported lost or stolen) or otherwise barred from network access. Verify Data Plan: Ensure your device is set up with the correct data plan for the services you expect. IMEI Registration Check: For phones purchased internationally, some countries require the IMEI to be registered with local authorities. Your carrier can advise if this applies. Suggest Plan Upgrades: If your issue is related to data caps being reached or network deprioritization due to heavy traffic on a lower-tier plan, they might suggest a plan upgrade.
The carrier's role is crucial for issues stemming from the network itself or your service agreement. They are the gatekeepers of your connection on their end.
Table 1: Is It Your Carrier? When and What to Ask

iPhone Repairs
Whatever repairs you need to an iPhone from a screen to a battery replacement to Water Damage, Camera and Charing Port Replacements. We stock most iPhone parts in-store for most repairs

Smasung Repairs
Providing repair services for Samsung Galaxy phones and tablets, addressing common problems like screen damage, battery drain, and charging port issues

iPad Repairs
Offering solutions for a range of iPad problems, including screen replacements, battery issues, charging port repairs, and fixes for camera and speaker malfunctions.

Windows Computers
Addressing a wide range of computer issues for laptops and desktops, including slow performance, virus removal, hardware repairs, software troubleshooting, and data recovery.

Other Phone Repair
Offering repairs for a variety of phone brands beyond Apple and Samsung, including Huawei, Google, Sony, and Motorola, with common services like screen and battery replacements.

Other Electronics Repair
Repairing a diverse range of electronics such as Gaming Devices, Xboxes, Soldering repairs and who knows what. Just ask and we can tell you if it's something we do.

Macbook Repair
Addressing a wide range of computer issues for laptops and desktops, including slow performance, virus removal, hardware repairs, software troubleshooting, and data recovery.

Data Recovery/Transfers
We can recover data from a large collection of devices and types of media. PC Hard Drives, USB devices, External Storage, Mac Drives and more. Use the enquiry form to find out


Mend My iPhone
9 Southgate, Market Weighton, YO43 3AF
TEL 07934062949


What our customer think of us
Super Simple 3 Options

Book-Online
Preferred Method - we can make sure then we have the parts and time available to give you the best experience in the fastest time

Walk-in
Whilst we have no objection to walk in repairs you will likely be at the back of the queue for same day repairs .

Mail-in
Whilst we have no objection to walk in repairs you will likely be at the back of the queue for same day repairs .
Ready to get started?
Mend My iPhone
Enquiry Form
By checking this box, I consent to receive transactional messages related to my account, orders, or services I have requested. These messages may include appointment reminders, order confirmations, and account notifications among others. Message frequency may vary. Message & Data rates may apply.Reply HELP for help or STOP to opt-out.
By checking this box, I consent to receive marketing and promotional messages, including special offers, discounts, new product updates among others. Message frequency may vary. Message & Data rates may apply. Reply HELP for help or STOP to opt-out.
Mend My iPhone
9 Southgate
Market Weighton
YO43 3AF
TEL 07934062949
EMAIL info@mendmyiphone.co.uk

LINKS TO REPAIR PAGES
OTHER SERVICES
CUSTOMER CARE
NEWS
LEGAL

© Copyright 2025. Mend My iPhone. All Rights Reserved.